INSTALLING CUSTOM ROM FOR HTC EVO 3D
Here's a guide I made to root your Evo 3d and install custom ROMs. I made it as simple as I can and I assume you are using windows and got the phone from ASDA with an hboot of 1.49.0018. It worked for me but I am not 100% sure if this is accurate as I can't redo all the steps to confirm.
Disclaimer: I am NOT responsible for any damages caused by this guide. Use it at your own risk. Please message me for corrections or comments so I can update this guide. If you didn't get the phone from ASDA or your HBOOT isn't 1.49.0018 then this guide in NOT for you. I cannot confirm if this works with Evo 3d bought from other retailers and those with a different Hboot number as I only have one from ASDA.
Caution: You may lose some apps and data by doing this. Photos, videos,music, and other documents in the memory card will not be deleted unless you format the card before starting. You may copy all your photos, videos, music, etc. to your PC before starting and copy them back to the card afterwards. After doing this method, you will be able to backup apps and their data by using Titanium Backup in the Android market.
1. Download and install this file (alternate link 1) (alternate link 2) on your PC. This file is NOT to be included in the memory card with the others, just installed to the PC.
2. Download this file (alternate link 1) (alternate link 2), this file (alternate link 1) (alternate link 2), this file (alternate link 1) (alternate link 2), and this file (torrent link).
3. Do not unzip any of them. Just save them all (excluding the file in step 1) to the memory card of the phone outside any folders.
3a. To save it, you can use a memory card reader to transfer the file or a micro USB cable. Make sure the "disk drive" option is chosen in the phone's screen so you can see the memory card as a removable drive.
4. Power off your phone.
5. Press and hold Volume Down button and Power button to open hboot (it should be 1.49.0018 and will be downgraded to 1.49.0007).
6. When it turns on the phone will automatically find one of the files and will ask for confirmation if you want to "flash" or install it. Press the volume up button to confirm.
7. When that is done, turn off the phone by choosing reboot. You can choose the options by pressing the up and down button then select by pressing the on/off button. If this doesn't work, just take out the battery and then turn on as normal.
8. After turning on, delete the first file you put in your memory card (PG86IMG.zip) by using a memory card reader or via micro USB cable "disk drive option". You may also use file management apps from the Android market like Airdroid to transfer and delete files in the memory card.
9. Unplug the USB cable and then connect your phone via USB again but this time on "charge only" mode with USB debugging enabled. (Go to settings > applications > development, then check USB debugging)
10. Go here click download for windows, save the file, unzip it and run revolution.exe file. Do not close the webpage as you need to enter a beta key that will be shown on the program.
11. Go back to the webpage and choose Windows as your operating system, Evo 3d GSM as your device, and choose the Hboot ending in 7. Put the serial key from the program into the last box then click Generate key.
12. Copy the generated key into the program you are running then let it do it's work. After it's done rebooting in fastboot several times, it's going to prompt you to download clockwork, enter "y" (for yes)
13. After everything is done, reboot the phone normally and then Reboot into recovery (you can choose this option when you try to power off the phone). If this doesn't work, you can boot into hboot by holding down Volume Down button and Power button then choose recovery in the menu. Again, You can choose the options by pressing the up and down button then select by pressing the on/off button.
14a. To install the new ROM (leedroid or other) in recovery mode/clockwork, choose "install zip from sd card" and then choose su-3.0-efgh zip file (you only need this file once, you may delete this afterwards). After that, repeat the procedure but this time choose Synergy superwipe zip from the memory card (or do a manual wipe if that doesn't work). Lastly, repeat procedure (choose install zip fom sd card) but this time choose the leedroid zip or any other ROM you want. Reboot. DONE!
How to do a manual wipe: In Recovery, choose 'wipe data/factory reset', then choose 'wipe cache partition', then go to 'advanced' and then choose 'wipe dalvik cache'
14b. If you've done this guide and want to try another ROM, in recovery mode/clockwork, choose 'backup and restore' and then choose backup to do a NAND backup in case you want to go back if anything goes wrong. Then choose "install zip from sd card" and then choose Synergy superwipe zip from the memory card (or do a manual wipe if that doesn't work). Lastly, repeat procedure (choose install zip fom sd card) but this time choose the ROM you want. Reboot. DONE!
.
Optional
15. If you are having problems and want to use other roms you can go here to choose from a wide selection of ROMs. Make sure they are for Evo 3d GSM not CDMA. Don't forget to use superwipe before installing new ROMs. Superwipe will NOT format your SD card nor delete any contents on it. It is for cleaning the phone's system.
15a. To install a new ROM, follow step 14 but skip the su-3.0-efgh zip file. Please read about the ROM before installing it because they may contain bugs or might be incompatible with your Evo 3d. For those who want the original/default ROM, you can get it from this link.
15b. It is wise to do a NAND backup -- a backup of everything in your phone (all apps, settings, contacts) except photos, music, videos, documents -- before installing a ROM so you can just restore it easily if anything goes wrong. To do this, just choose backup and restore in the menu. This is different from Titanium Backup as it is the whole state of your phone rather than individual backup of apps and their settings.
HOW TO INSTALL FREE APPS USING INSTALLOUS
 |
| DISCLAIMER: THIS ARTICLE IS FOR EDUCATIONAL PURPOSES ONLY. PIRACY IS AGAINST THE LAW! |
INSTALLOUS
You have to add other repositories (online places where the apps/files are) on Cydia so you can find the apps/files you are looking for. You can do this by opening Cydia, then go to Manage, then choose Sources, tap edit on the upper right corner, then tap Add on the upper left hand corner. This will prompt you to input a URL address. Add the addresses listed below individually then tap Add Source:
 |
| Make sure you include www on other addresses. |
What we need is an app called Installous which can be found in the Hackulo.us repository which is the easiest way of directly downloading and installing IPA files into your Iphone/Ipod Touch. Just do a search for Installous after adding the cydia.hackulo.us repository and install it. The other repositories are useful for finding Cydia apps/tweaks which are not available with the default repositories (repo for short) so make sure you add them as well. After installing Installous, open the app. It should look like this:
 |
| This is the latest version of Installous as of February 2011. |
Before doing anything, tap on the Settings option. Turn on Install automatically, delete automatically, and Itunes sync so that the apps will install itself right after downloading it. You DO NOT need the installation file after installing the app so you need to delete it to save space UNLESS you want to share the installation file to your friends or keep a copy if ever someone accidentally deleted the app.
 |
| Installation files are not needed after installing the app so automatically delete them. |
To find apps from Installous, you may browse the new apps or do a search. The list is arranged chronologically so the latest apps and updates are listed first. Make sure you type the correct spelling of the app you're searching to get the result you need. Sometimes there will be error messages like "IPA not Found", this means that the app you are looking for does not exist on the database (check the spelling) or the server is down (try again later).
 |
| If "IPA not Found" check the spelling for Search or try again later. Server might be down. |
 |
| Price of the app might be listed when you scroll down but you DO NOT have to pay it. |
 |
| Try other links/versions if the one you used does not work. |
After choosing the link you want, the app will open the site like in a normal browser. Here you will encounter one of three of the most common file sharing sites (FileDude, FileApe, MediaFire) where there are different ways of downloading the file. The key is to know which button to tap because the sites are crammed with false download signs and zoom in so that you hit the right button and not the ads which will take you somewhere else. Here's a step-by-step guide on how to download the file:
FILEDUDE
 |
| Tap "OR JUST DOWNLOAD NORMALLY" |
 |
| Tap the blue underlined Download sign in the middle. The download will start if successful. |
FILEAPE
 |
| Tap "REGULAR" |
 |
| Wait for the download link to appear after the countdown. |
 |
| Tap on "Download Ready!". Zoom in to make sure you tap correctly. The download will start if successful. |
MEDIAFIRE
 |
| Just wait for the "Click here to start download.." to appear. |
If the you succeeded in starting the download, you will see a notification on the screen saying the download has started. Sometimes it may take a while for the download to start and sometimes it gives an error. You may check your internet connection if this happens and try again or try the other links. While downloading, you may go and look and download another app or tap on the downloads tab on the bottom to see the progress of your download. Here you may edit your downloads (stop or delete them) and see your previous downloads if you chose not to delete them or if they fail to finish.
 |
| Downloads vary according to internet connection quality. |
UPDATING APPS
Some apps get regular updates for better usability and bug fixes. You CANNOT update apps you got from Installous in the AppStore. You can update them from Installous by tapping on the Updates icon and the app will automatically search for new versions of your installed apps. Update is done by downloading and installing the newer version of the apps INDIVIDUALLY like the regular installation of new apps. DO NOT delete the apps you want to update. This will erase all your saved games. Installing a new version of the app will automatically overwrite the old one so there is no need to delete the existing app to update.
 |
| Installous will automatically search for updates. Check for updates regularly. |
TROUBLESHOOTING
After the download or update, you may check your Springboard if the app icon is there. Try opening the app to see if everything is working as it should. If the app did not install or update correctly, there may be several reasons for this:
- You may have downloaded a corrupt file. This is caused by incomplete downloads or bad transfers.
- Your firmware version or device generation does not support the app.
- The latest update does not support your device.
- There may be conflicts with other apps installed on your device.
- The installation process might have been disrupted.
- The developer found a way of stopping the cracked app to be installed in your device.
Here are several tips to remedy this problem:
- Try the download again.
- Get better internet connection.
- Try the other download links.
- Try lower versions of the app.
- Update your device's firmware.
- BUY the app in the AppStore.
Happy installing! :D
HOW TO MAKE THE MOST OUT OF CYDIA + 10 MUST HAVE TWEAKS/MODS
 |
| This is the reason why I finally got an Apple device. |
ADDING REPOSITORIES
You have to add other repositories (online places where the apps/files are) on Cydia so you can find the apps/files you are looking for. You can do this by opening Cydia, then go to Manage, then choose Sources, tap edit on the upper right corner, then tap Add on the upper left hand corner. This will prompt you to input a URL address. Add the addresses listed below individually then tap Add Source:
 |
| Make sure you include www on other addresses. |
DELETING CYDIA APPS/TWEAKS
Of course, you should know how to undo whatever tweaks/installations you did if ever something goes wrong or if you just don't like the tweak/app you installed. There are several ways to do this. One is to install Cydelete from Cydia which will allow you to delete Cydia apps like regular apps (holding the icon and tapping the delete button when they start shaking).
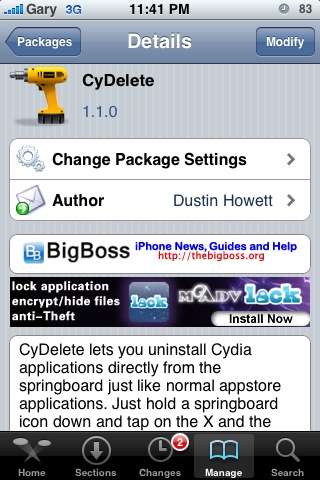 |
| This will not add a new app icon but it will work instantly. |
COMPATIBILITY
Remember that apps/tweaks are made by different people and some cannot test their apps/tweaks on all generations of iphone/ipod touch and the different firmware versions. Also, tweaks/apps can have conflicts on other tweaks/apps already installed on your device. In short, not all tweaks/apps will work on your device. Always read the description information of the tweak/app before installing. Some incompatible tweaks/apps will not only work on your device but also cause bugs and/or eventually cause the springboard to crash. If this happens, you may try to restart the springboard to see if it will work or you can tap okay and then delete the app/tweak that caused the problem. Tweak/apps that are graphics heavy like animated wallpaper, motion flow docks/boards, etc. will have an impact on your battery life making it shorter and/or use up more RAM (memory) which will lead to crashing of other apps therefore I don't recommend them.
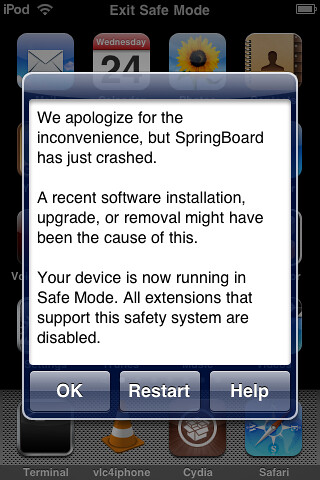 |
| Try reastart or delete the app that caused the crash. |
Now that you have the basics covered, you may now proceed in getting all the tweaks/apps you want. You may go to the Sections screen in Cydia which has all the available files sorted in various folders. Not all tweaks/apps are worth downloading and some might just cause problems in your device so be warned. Try to read reviews on it first and make sure that it is compatible to your device. The following are some of my favourite Cydia tweaks/apps aside from SBSettings (click here for review) and Bytafont (click here for review) which I personally use. Just search them on Cydia (make sure you have the correct spelling and the repositories) and install them. The list is not in any particular order as these tweaks do different things which makes them a must have for your iDevice. They will not add a new icon on your springboard so don't bother looking for them. You can go to Settings and scroll down to see if they are listed and adjust the various options or go directly to the app they tweak (Photo Album, Email, etc) to see if they work.
| AndroidLock XT |
| Iconoclasm |
 |
| Direct Closer Pro |
 |
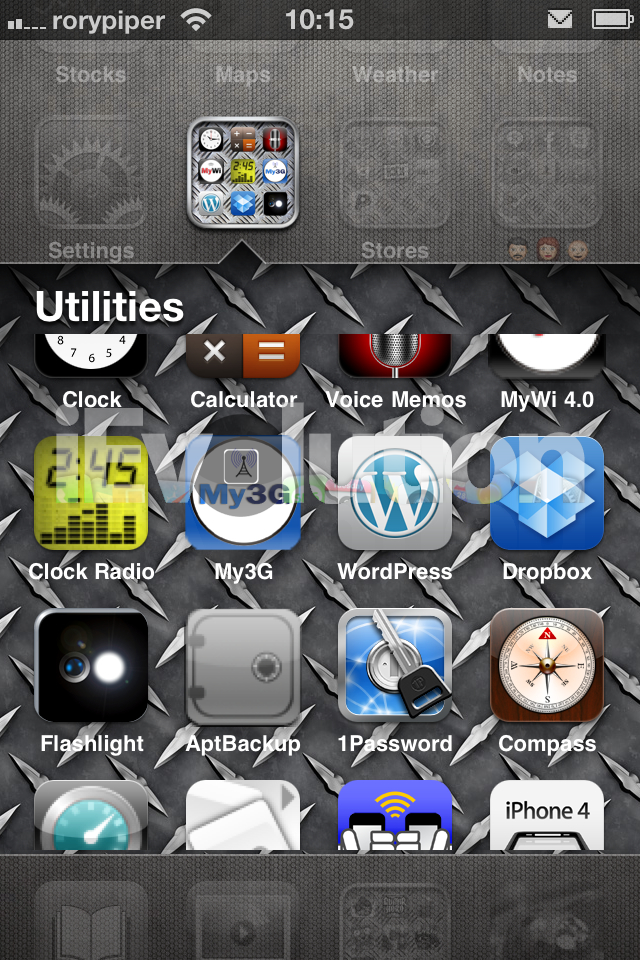
| Icon Renamer |
I confess, I am a bit of an OC (Obsessive Compulsive) so I get irritated when the names of apps are not uniform (capitalization, overlapping, too short/long). This tweak will enable you to change an app's name to anything you want (even using emoji characters). This is one of the many simple things Apple should have included in the official iOS but didn't so we have to jailbreak our devices just to get these small tweaks which greatly improve the usability of the device.
 |
| Infinifolders |
Making folders on the iphone/ipod touch is great but its limited to 16 icons per folder. Most of the time, we need more than 16 icons so we make another folder name Games 2 and then fill that up so we have to make another. Infinifolders give you the ability to add as much apps in one folder as you need and the ability scroll up and down the folder. There are other folder tweaks in Cydia like Folder Enhancer and such that have more features such as folders in folders function but they cause conflicts in Itunes and other programs so you may try them at your own risk.
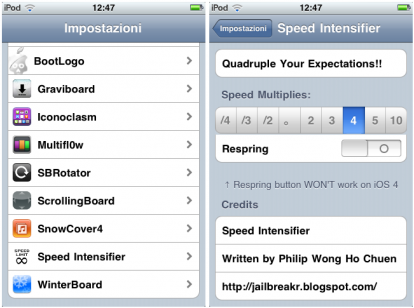 |
| Speed Intensifier |
This tweak will shorten the various system animations such as the loading icon, app switching transition, and others making it look faster than usual. This is just a visual tweak and does not overclock the CPU nor it affects battery life. You can choose the speed you want and then respring to apply the effect.
 |
| SpringClean |
I got this tweak because of the Power Alerts which bugs me a lot. You have the option to dismiss all the power alerts altogether or adjust it so it appears on the percentage you want. It will also give enable sounds on iphone start-up or when your battery is fully charged to prevent overcharging. Moreover, you can also tweak status bar labels (on/off) and homepage indicators.
 |
| PhotoAlbums+ |
This app is the first app I bought from Cydia. It pains me to realise that you cannot make new folders inside the default Photo Album other than the Camera Roll and sort your photos. Its quite daft as the simplest camera phones can do this feature easily but the sophisticated iphone/ipod touch can't so once again we turn to jailbreaking and Cydia apps. This app will be able to make new folders and even able to make them private by locking them with a password. This will tweak the default Photo Album app and not add a new app which is the best thing for me as it works seamlessly.
 |
| PhotoMail |
By default, you can only email photos in your photo album one at a time and you cannot attach photos on the email app. This tweak breaks that limit and adds an option to add as much photos you want while composing an email. You will also have an option to resize the photos before sending them.
 |
| Synchronicity |
You cannot use your iphone/ipod touch while it syncs to Itunes and other programs which makes it useless for long periods of time specially when you transfer files or when you are backing up your data. This tweak will make that go away as it will make the syncing a background process and you will be able to do other things while you are syncing.
Got more tweaks you like? Add it on the comments below! :)
HOW TO JAILBREAK IPHONE / IPOD TOUCH
So, you finally gave in and got an Idevice (Iphone/Ipod Touch) you previously loathed to death. Might be hard to admit but after using it for yourself you realise you were utterly impressed and got converted to "the other side". Not wanting to become an Isheep (uber Apple fanboy), you decided to jailbreak your device to break free of Apple's lovely embrace. Here's a flowchart I made as a guide for different generations and firmwares:
If your Idevice is fresh, you will need to connect it to Itunes to have it activated and registered (not required for activation). Click here to download Itunes
Once you have Itunes installed, connect your Idevice to the PC using the USB cable. DO NOT click yes to any pop-ups asking you to update the current firmware if you want to jailbreak your device. Also, DO NOT click on the update button on the itunes window. Check your software version, it should be 4.1 or lower for an unthetered jailbreak. This kind of jailbreak is the best because you wont need to run the jailbreak every time your device is turned off which is the case for tethered jailbreak.
If your software version is lower than 4.1, you may upgrade it by downloading the 4.1 firmware from this website and click the restore button in itunes while holding the left shift button. This will prompt you to choose the downloaded firmware and then wait for it to finish. For devices having firmware 4.2 and above, you might try this method but success is not guaranteed.
If your firmware is already 4.1, you may now proceed in jailbreaking your device. You should know the following before starting the jailbreak procedure:
 |
| Click the image to see large size. |
* - Download 4.1 firmware for your device here: Click here for link
** - Downgrade guide: Click here for link
A – Guide: Click here for link
B – This guide is for you so read on.
C – Just use Safari browser on your device and go to jailbreakme.com and follow the instructions.
If your Idevice is fresh, you will need to connect it to Itunes to have it activated and registered (not required for activation). Click here to download Itunes
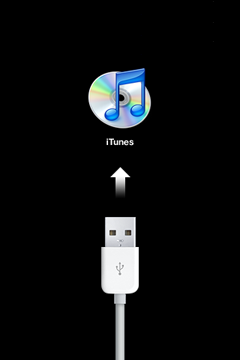 |
| Itunes is needed for activation. |
Once you have Itunes installed, connect your Idevice to the PC using the USB cable. DO NOT click yes to any pop-ups asking you to update the current firmware if you want to jailbreak your device. Also, DO NOT click on the update button on the itunes window. Check your software version, it should be 4.1 or lower for an unthetered jailbreak. This kind of jailbreak is the best because you wont need to run the jailbreak every time your device is turned off which is the case for tethered jailbreak.
 |
| Do not click the update button if you want to jailbreak. |
 |
| Just use the direct links on the lower part of the web page. |
- Jailbreaking is completely legal IF used responsibly. You may read this article if you want to know more.
- Jailbreaking is completely safe. You may undo it any time you want and restore it to its original settings. Just remember to do it properly and don't tweak settings you don't understand so everything works as they should be. It will not leave any trace after you undo the jailbreak so no one will know if you jailbroke the device.
- Jailbreaking does not void the warranty. It is software modification and does not involve touching any hardware in your device. If you need to avail of the warranty from Apple, just undo the jailbreak and restore it to its original settings before sending it off for repair. Note that Apple might update your firmware and will hinder you to do proper jailbreak.
- You will still be able to access and download apps from the official appstore. Jailbreaking will not have any negative effects on apps nor will make your device laggy. If your device exhibits any type of malfunctions, restore the device and redo the jailbreak.
 |
| Choose your OS, download, unzip, and run the Greenp0ison jailbreak program. |
In this jailbreak, we will use the greepois0n method which you can download here. There are other methods available like limew1re and redsn0w but this is the one I have tried and tested so I am recommending this one. Just download it, then unzip the file, and run the program. Turn-off your device and connect it through the USB cable and just follow the steps that will appear on the program window.
 |
| The sleep button is on the top of the device while the home is the round button in front. |
The program will automatically tell you if you are successful in each step. If you miss any of them, the process will be restarted until you get all of them right. After the steps, the program will do the rest and you can just wait for it to complete. After restarting, be sure that your device is connected to wi-fi (required). This is needed for getting Cydia by tapping on the new Loader icon. You will have the option to delete this icon as it will not be needed after you get Cydia.
To check if your device is jailbroken, you should have the Cydia icon on your device. The first time you open Cydia, it will ask you what kind of user you are. Choose "developer" even though you don't make programs because it will list all the programs available which will be helpful in the next how to articles in this blog. If it asks you to make your life easier, choose OK. This will automatically sa your SHSH blob which will be needed for future jailbreaks. You may also notice that cydia loads several files every time you start it up. This is normal.
 |
| Wi-fi needed before opening the Loader icon. |
 |
| SUCCESS! |
You might want to stay away from itunes after the jailbreak because you might "accidentally" update your firmware which will erase the jailbreak. It may also delete apps you got from Cydia and other sources other than the app store. There are also instances when syncing becomes a problem as some additional features acquired from Cydia such as infinite folders and others makes the itunes confused. For a list of free (and more reliable) alternative programs click here.
So what do you do now? There are lots of things you can do now that you've successfully jailbroken your device but first, its important to back-up your SHSH blob (aside from the Cydia back-up) for future jailbreaks. You can do this by using a PC program called Tiny Umbrella which you can get from here. There is another method that you can do directly from the Idevice. Just go to Cydia > Search and type iSHSHit. Install, run the app, and back-up you SHSH by emailing it to your email.
 |
| Fuuuuu----- |
 |
| iSHSHit for backing up your SHSH. |
What next? Get SBSettings from Cydia and fully manage your idevice. You can get it by searching it on Cydia like what you did for iSHSHit. You may read more about it here. Why not change the fonts of your device? Just read how to do it here. Lots of stuff for jailbroken will be added in this blog so don't forget to visit often. Cheers!
HOW TO GET THE BEST SOUND QUALITY
 |
| Fuuuuu---- |
One of the main things we choose iphones and ipods is for listening music. The ipod brand is synonymous to mp3 players and Apple claimed that iphones are the best ipods they've created so we expect to get the best quality audio experience. But how come some people are not happy with the sound quality? In this article I am going to discuss how you could make your iphone, ipod, or other mp3 players sound better.
 |
| I <3 Ralph... |
- Bit rate - Put simply, this is the number of bytes used per second hence the kbps (KiloByte Per Second) unit. The more kbps we use, the more details of the sound can be stored so the output sound will be better. If the kbps is low, there is not enough room for the sound data to be recorded resulting to inferior sound quality. The higher the bit rate, the bigger the file will be. Usually, bit rates from 96kbps (FM quality) to 320kbps (CD quality) are used by most people.
- Sampling Rate/Frequency - This is the number of signal per second (in kHz - kilohertz) taken from a continuous signal. Common sampling rates are 44100 Hz (44.1 kHz) used by audio Cds and 48000 Hz (48 kHz) used by professional digital video equipment (tape recorders, video servers, etc). 44.1 kHz is advisable for it produces a maximum frequency of 20 kHz which is the highest frequency humans can hear. Moreover, as you grow older, the frequencies you can hear gets lower (many older people cannot hear above 14.5kHz) so going over this is not so practical.
- Lossless/Lossy Compression - Describes whether or not, in the compression of a file, all original data can be recovered when the file is uncompressed. Lossless means every single bit of data that was originally in the file remains after the file is uncompressed so this is the best format you can have for audio quality. Examples of lossless formats are FLAC, Apple lossless, and Lossless WAV. The downside of this is that the file sizes are HUGE and the processing needed to play them takes a lot more. Lossy compression reduces a file by permanently eliminating certain information, especially redundant information. When the file is uncompressed, only a part of the original information is still there (although the user may not notice it). They are more common as they are smaller in size and are compatible with more devices (mp3, aac, wma, ogg, etc).
 |
| Audio quality rank from generationmp3.com - Ipods are not at the top :( |
- AAC (Advanced Audio Coding)/Protected AAC/HE-AAC (8 to 320 Kbps) - Better than MP3 at low bit rates (typically less than 128 kilobits per second) thus producing same quality sound in smaller file size. The higher the bit rate, the less advantage it has over mp3 and it is not as flexible or as popular. Protected AAC has restrictions such as can only be played in up to 5 PCs simultaneously, cannot be copied to another ipod with tracks coming from 5 different itunes account, etc. HE-AAC (High Efficiency Advanced Audio Coding) is optimized for low-bitrate applications such as streaming audio.
- WAV - Lossless format, high quality, compatible with most players but big in size. Can be compressed using different codecs but not as popular and as efficient as other lossless formats. Limited to 4GB in size. Cannot carry song details such as artist, cover art, genre, etc.
- Apple Lossless (ALAC) - Apple claims that audio files compressed with its lossless codec will use up "about half the storage space" that the uncompressed data would require. Limited compatibility with devices other than ipods.
- AIFF (Audio Interchange File Format) - An audio file format standard used for storing sound data for personal computers and other electronic audio devices. Being lossless and uncompressed, it uses much more disk space than MP3—about 10MB for one minute of stereo audio.
- Audible Enhanced Audio Format (aax, aax+) - Another not so popular format used mainly for audio books.
- MP3 CBR/VBR- Most common audio format for consumer media players. Very flexible (bit rate, sampling rate, tags, etc can be edited) and compatible with almost any player. Can contain tags such as artist, cover, art, album year, etc. VBR (Variable Bite Rate) MP3s is a type of MP3 where the bit rate is allowed to vary (meaning it automatically adjusts the bit rate for parts of the song that needs more detail/space) for more consistent quality as opposed to CBR (Constant Bit Rate) where the bit rate is the same through out the song even at the parts where it is not needed (like silent parts).
So what format should I choose?
- I want to save space more more songs - Use AAC format at 96kbps or higher
- I want the best quality sound in smaller size - Use Apple Lossless
- I want the best quality that will play anywhere - Use WAV
- I want the song to be compatible with other devices - Use Mp3 CBR at 128 kbps or higher
- I want everything! - Use a rope to hang yourself or choose a priority (size, quality, compatibility)
I personally recommend MP3 CBR (Constant bit rate) as it is the most popular format and will play in other devices should you feel the need. If you want to have a consistent listening experience and save space at the same time, I recommend converting your songs before syncing it to your iphone/ipod touch. It will take time but it will give you full control of what goes on with the track. You can do this by using a free converter from Freemake which supports both video and audio. Click here to download
 |
| Most users will be satisfied with 128 kbps at 44100 Hz stereo. |
If you are having trouble with the volume (i.e. some songs are too soft and other are too loud) you might want to normalize the volume of the songs using a free app called MP3gain (Click here to download). This will allow you to dictate how many decibels you want for every song and is completely reversible.
 |
| Make all your songs have the same volume. |
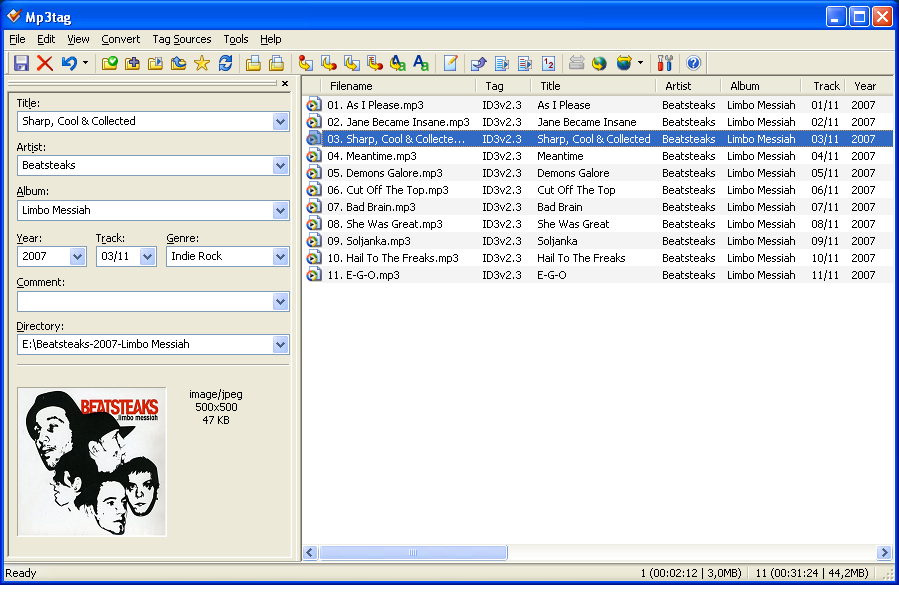 |
| I hate it when there's numbering on the track titles... X( |
My files are now okay but the sound still sucks! Well, the other thing that affects sound quality aside from bad song files are the earphones/headphones you use with your device. Experts say that it is a must to use earphones other than the one provided with your iphone/ipod because of its inferior sound quality. Here is a list of highly recommended earphones up to 100 GBP (155 USD/6900 PHP)from What Hi-Fi: Click here to see full list
 |
| Stay away from the stock earphones. Poor sound quality :( |
Always remember that you can always turn the bit rate up if you are not satisfied with 96 kbps (AAC) or 128 kbps (MP3) with the consequence of a bigger file. Different genres of music (rock, acoustic, ballad, etc) can benefit with more space for sound detail. Just make sure that the original files is of high quality and free from errors. With file quality and earphones/headphones checked, you can now enjoy the most from your music player of choice. Happy sound tripping!
Subscribe to:
Posts (Atom)


